LED Matrix Messenger
Spring 2020
A Project By Owen and Diane
Our project uses a web server to allow friends to send short messages to be displayed on a interactive LED matrix dashboard.
Introduction
This project consists of two nearly identical hardware setups, each located in a different physical house. Each setup includes one Raspberry Pi 3, one RGB LED matrix, and one distance sensor. The system starts by a user visiting a web page on their browser created with Flask web server and hosted by the Pi on their home network (Fig 1). The web page invites the user to submit a message to be sent to their friend’s LED matrix. The friend’s matrix receives the message through a MQTT channel hosted by the cloud IOT service Thingspeak. Once the message is downloaded to the friend’s Pi, the friend’s matrix displays a notification indicator, signaling to the user that they have unread messages. To display the messages, the user can walk up to their matrix and wave their hand in front of a distance sensor. Once the distance sensor detects their presence, the messages will be scrolled across the matrix. The system is bidirectional, i.e. either party can send or receive messages, providing an interactive and personalized mode of communication.
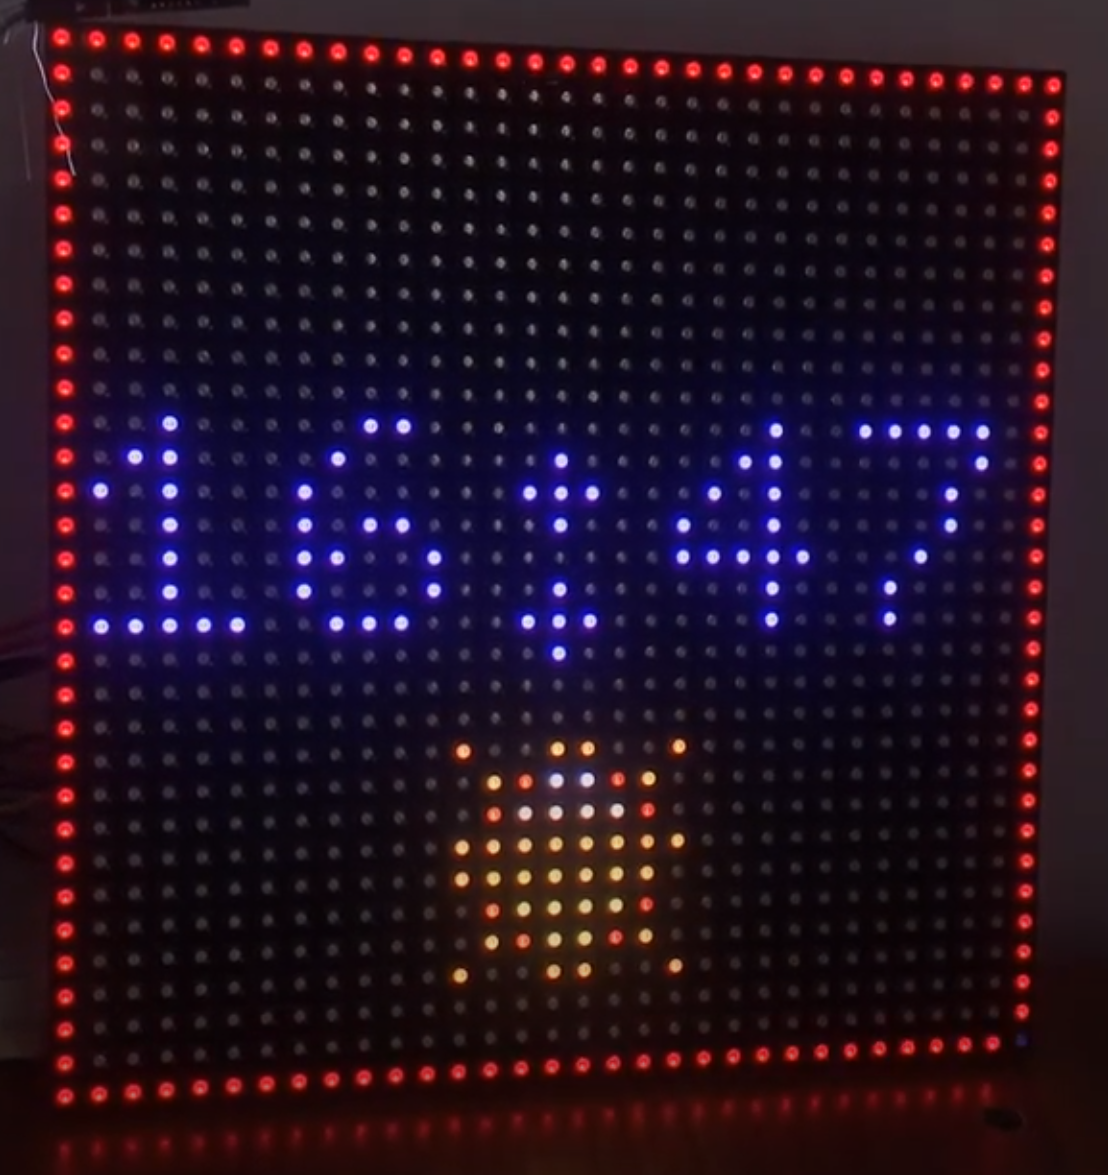
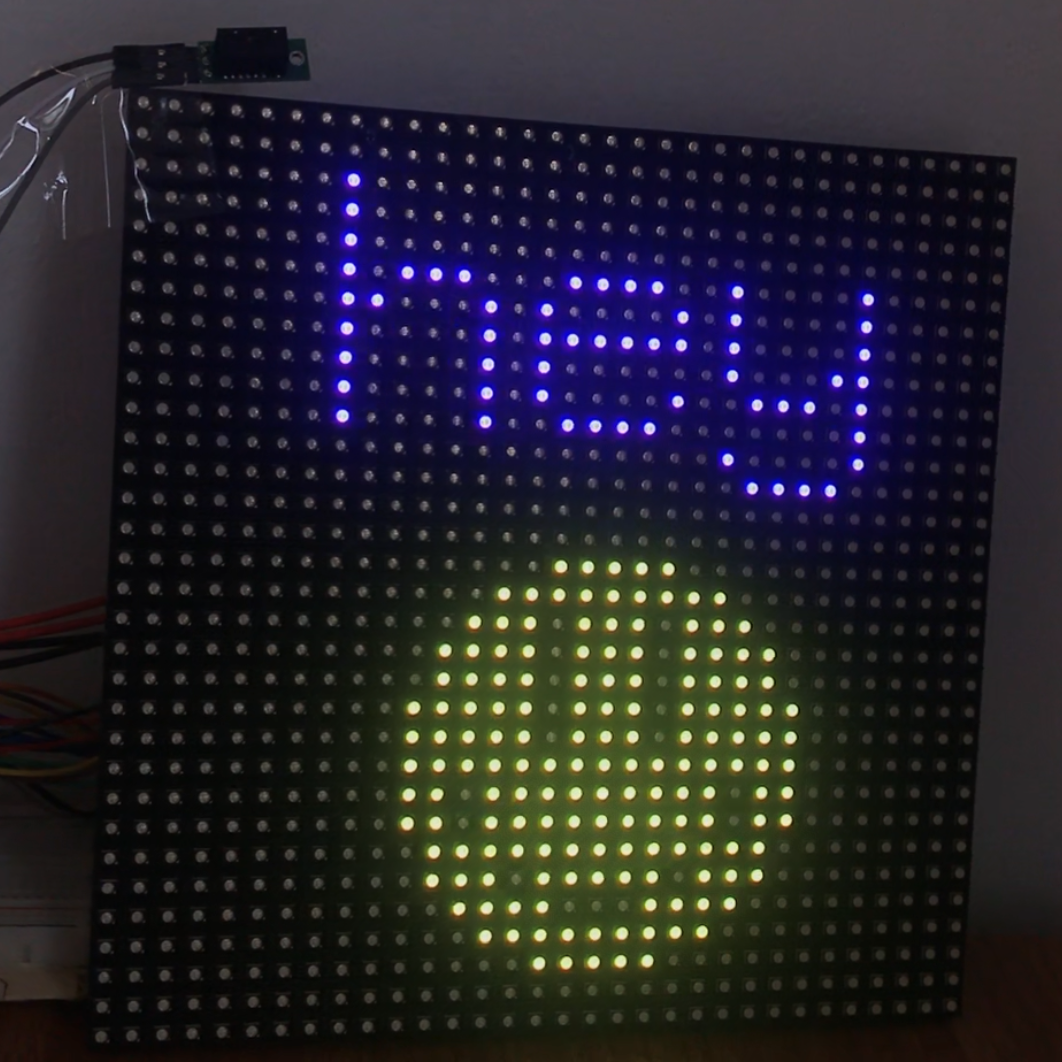
Color-changing notification indicator

Message and image displayed
Design & Testing
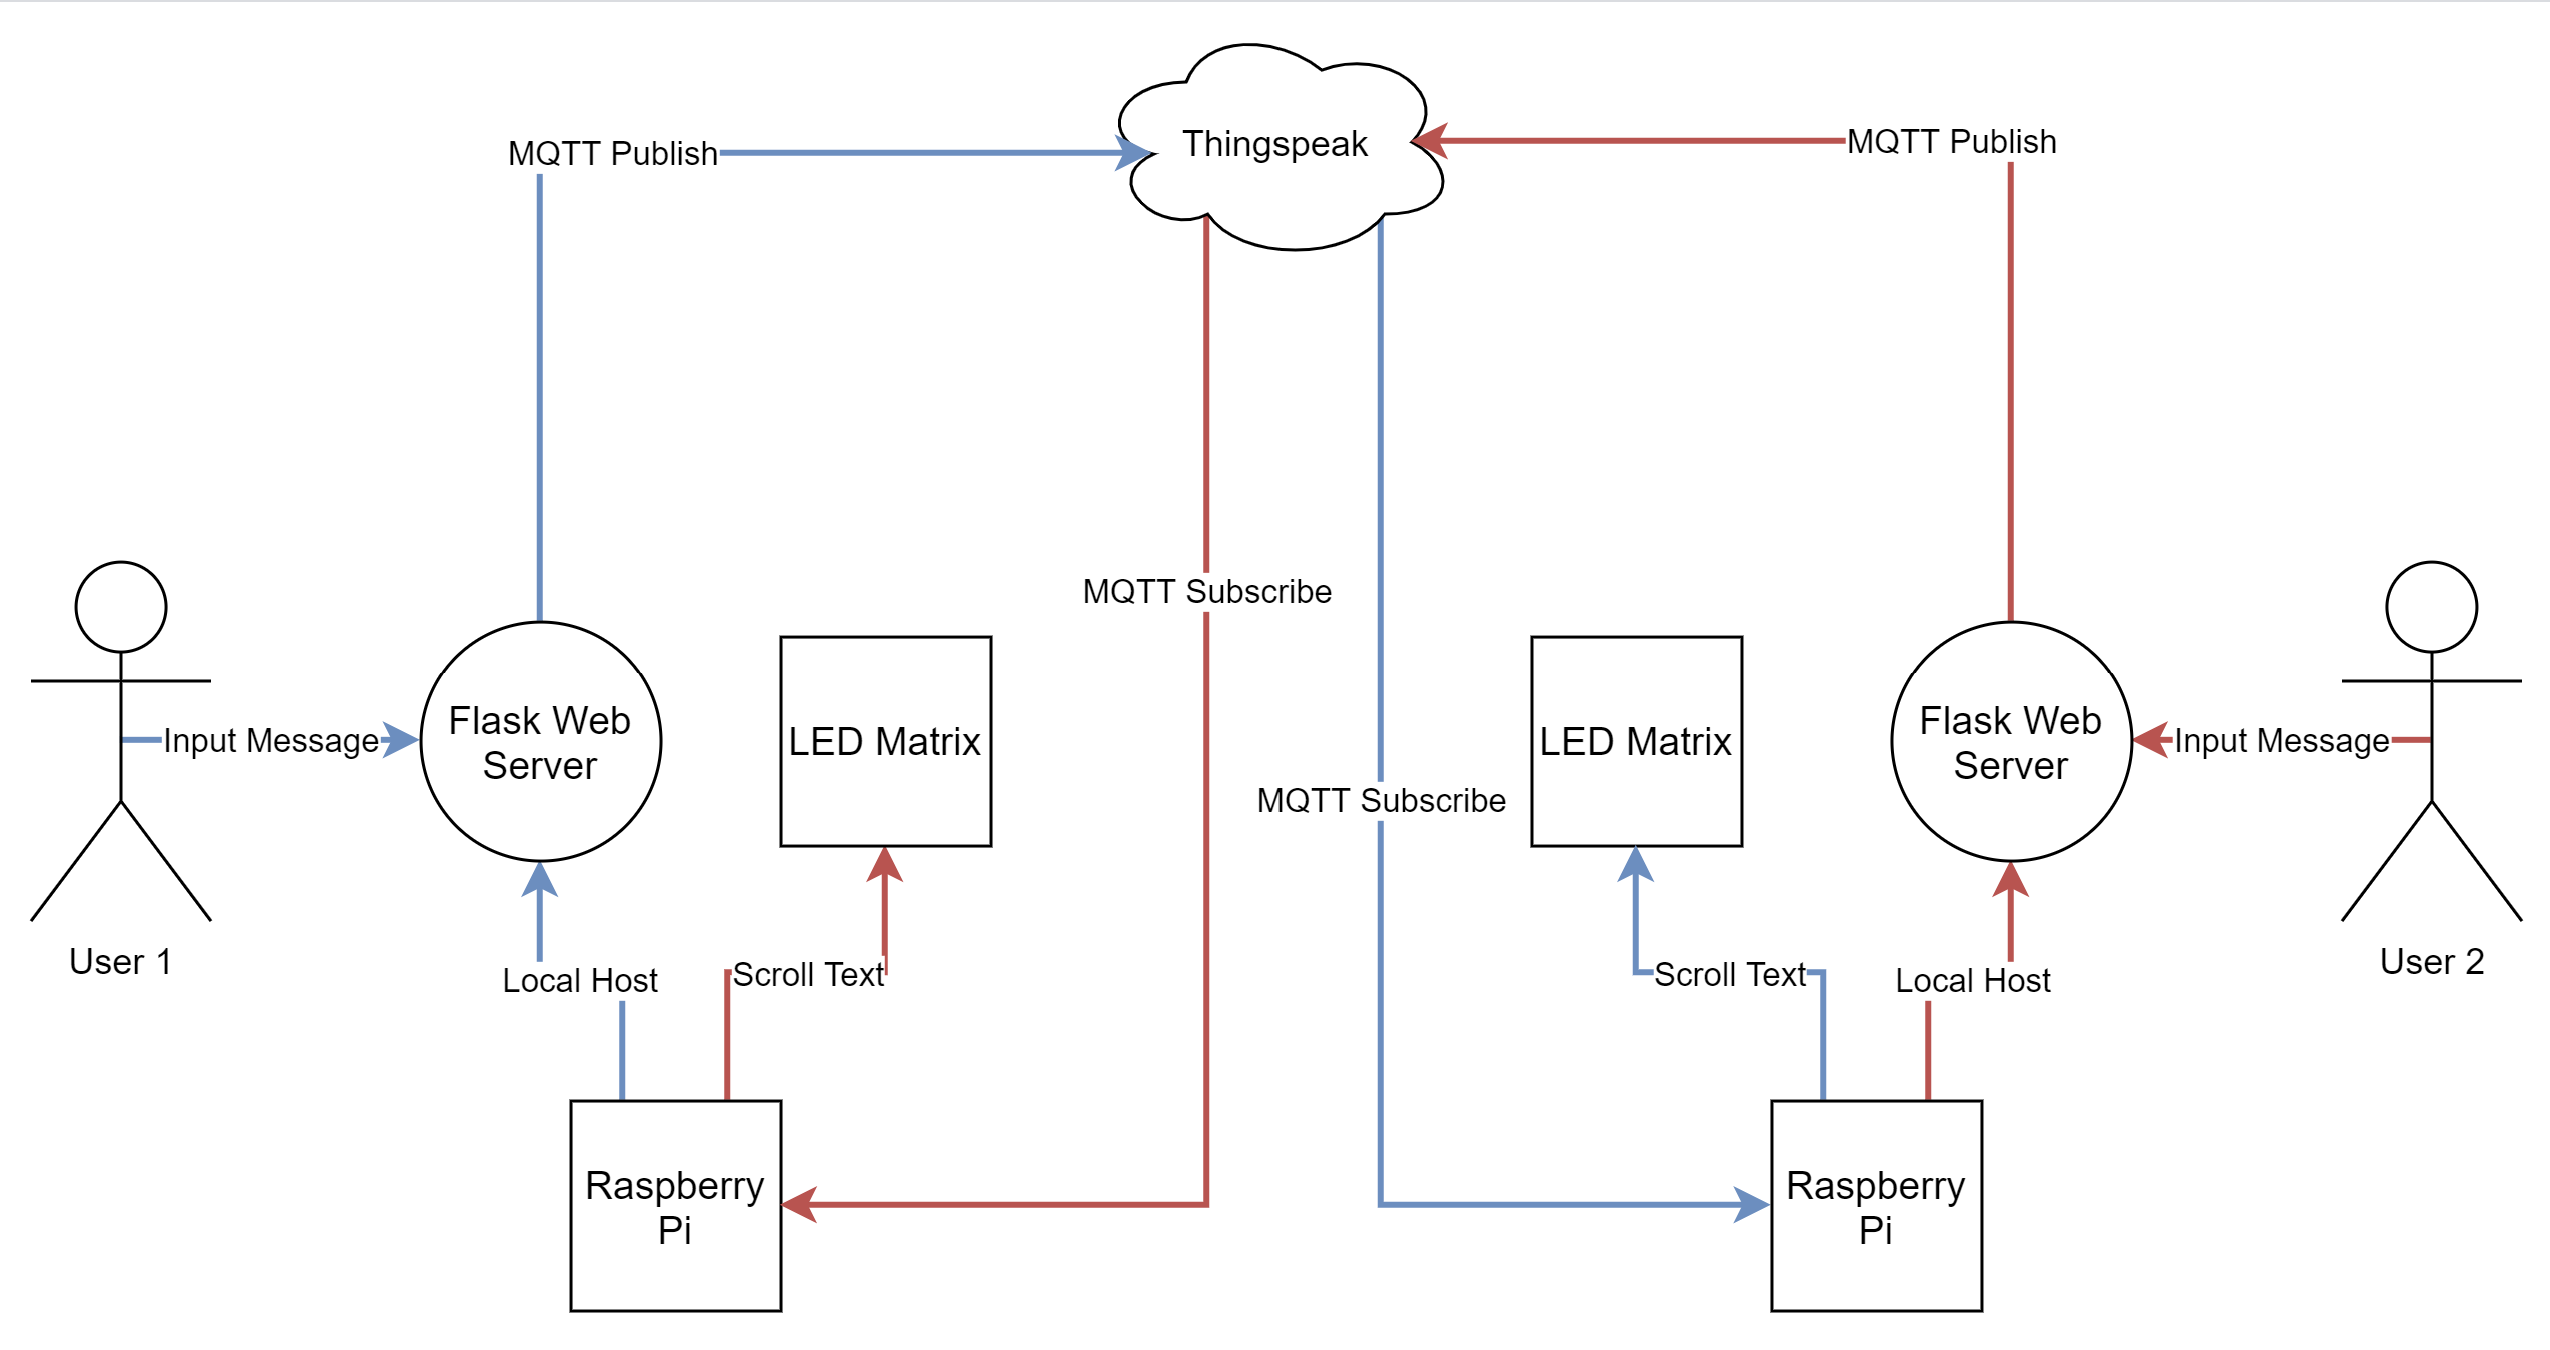
System diagram
MQTT
We began the project by working on sending and receiving text from one Pi to another over the internet. Initially, we were going to use TCP sockets to send data, but we quickly realized that there were already a lot of more user-friendly services that can serve as a communication medium. We decided to use Mathworks’s IOT service Thingspeak for sending and receiving messages because of its simplicity and prior experience with the platform. On Thingspeak, you can set up a channel for a project with however many fields necessary (in our case two because there were two people communication) for free that serves as your private address that you can query or send data to. At first we used HTTP GET and POST requests to move data, but while this worked, we realized it would mean constantly polling a certain field on our Thingspeak channel to see if a new message had been sent. Instead, we decided to MQTT which follows a subscriber-publisher model for communication. This way, we could publish a message to a field, which would activate a callback on the other Pi, notifying it of the new message, no extra polling or querying needed.
One issue we encountered with MQTT is with the QoS of Thingspeak. When sending a message through MQTT, typically you can specify a Quality of Service for the transmission that defines the guarantee of whether or not your message will be delivered. Thingspeak only supports a QoS of 1, meaning when we published a message, all that was guaranteed was the message would try to be delivered, not that the message was guaranteed to actually be delivered. This created issues where some messages would not be delivered because of too much network traffic or some other reason. To fix this, we implemented our own delivery checker. After a message is sent to Thingspeak, we polled Thingspeak for the latest message, and if the most recent message was not the message we just sent, we know the delivery failed and to try delivery the message again until it is successful. In the end, using MQTT as a communication protocol was very robust and resource efficient.
LED Matrix
After achieving communication between the Pis, we wanted to display the messages on the LED matrix. The biggest challenge with interfacing the matrix was the logic for the matrix is 5V while the Pi’s is 3.3V. Initally we thought we would have to order a hat to step all of the voltages up to 5V, but we later learned that the matrix will register the 3.3V logic just fine despite being a 5V device. This way we could connect the matrix directly to the Pi. To send commands to the matrix, we used Hans Zeller’s rpi-rgb-led-matrix library. The library is written in C++ because the precise timing commands neccessary for the matrix require access to the GPIO registers, which is only possible in C. However, Hans wrote a Python binding for all of the C++ commands, so we could effectivley just use Python to control the matrix, simplifying our code to one language.
Web App
To type or pick a message to send to the other user, we implemented a web application interface using the Flask python library. This allows us to run a python script that creates a web page at the pi’s IP address and specified port. The content displayed on this web page is created in an HTML file the python script reads from. Additionally, the python script listens for messages entered on the web page, or selected using the buttons. The python script is able to “listen” by using HTTP GET and POST. Our setup supports the sending of four images: a heart, a smiley face, a frowny face, and a flower. To send one of these images, the user would simply type their message and include either <heart>, <smiley>, <frowny>, or <flower> in the message, including the <> brackets.
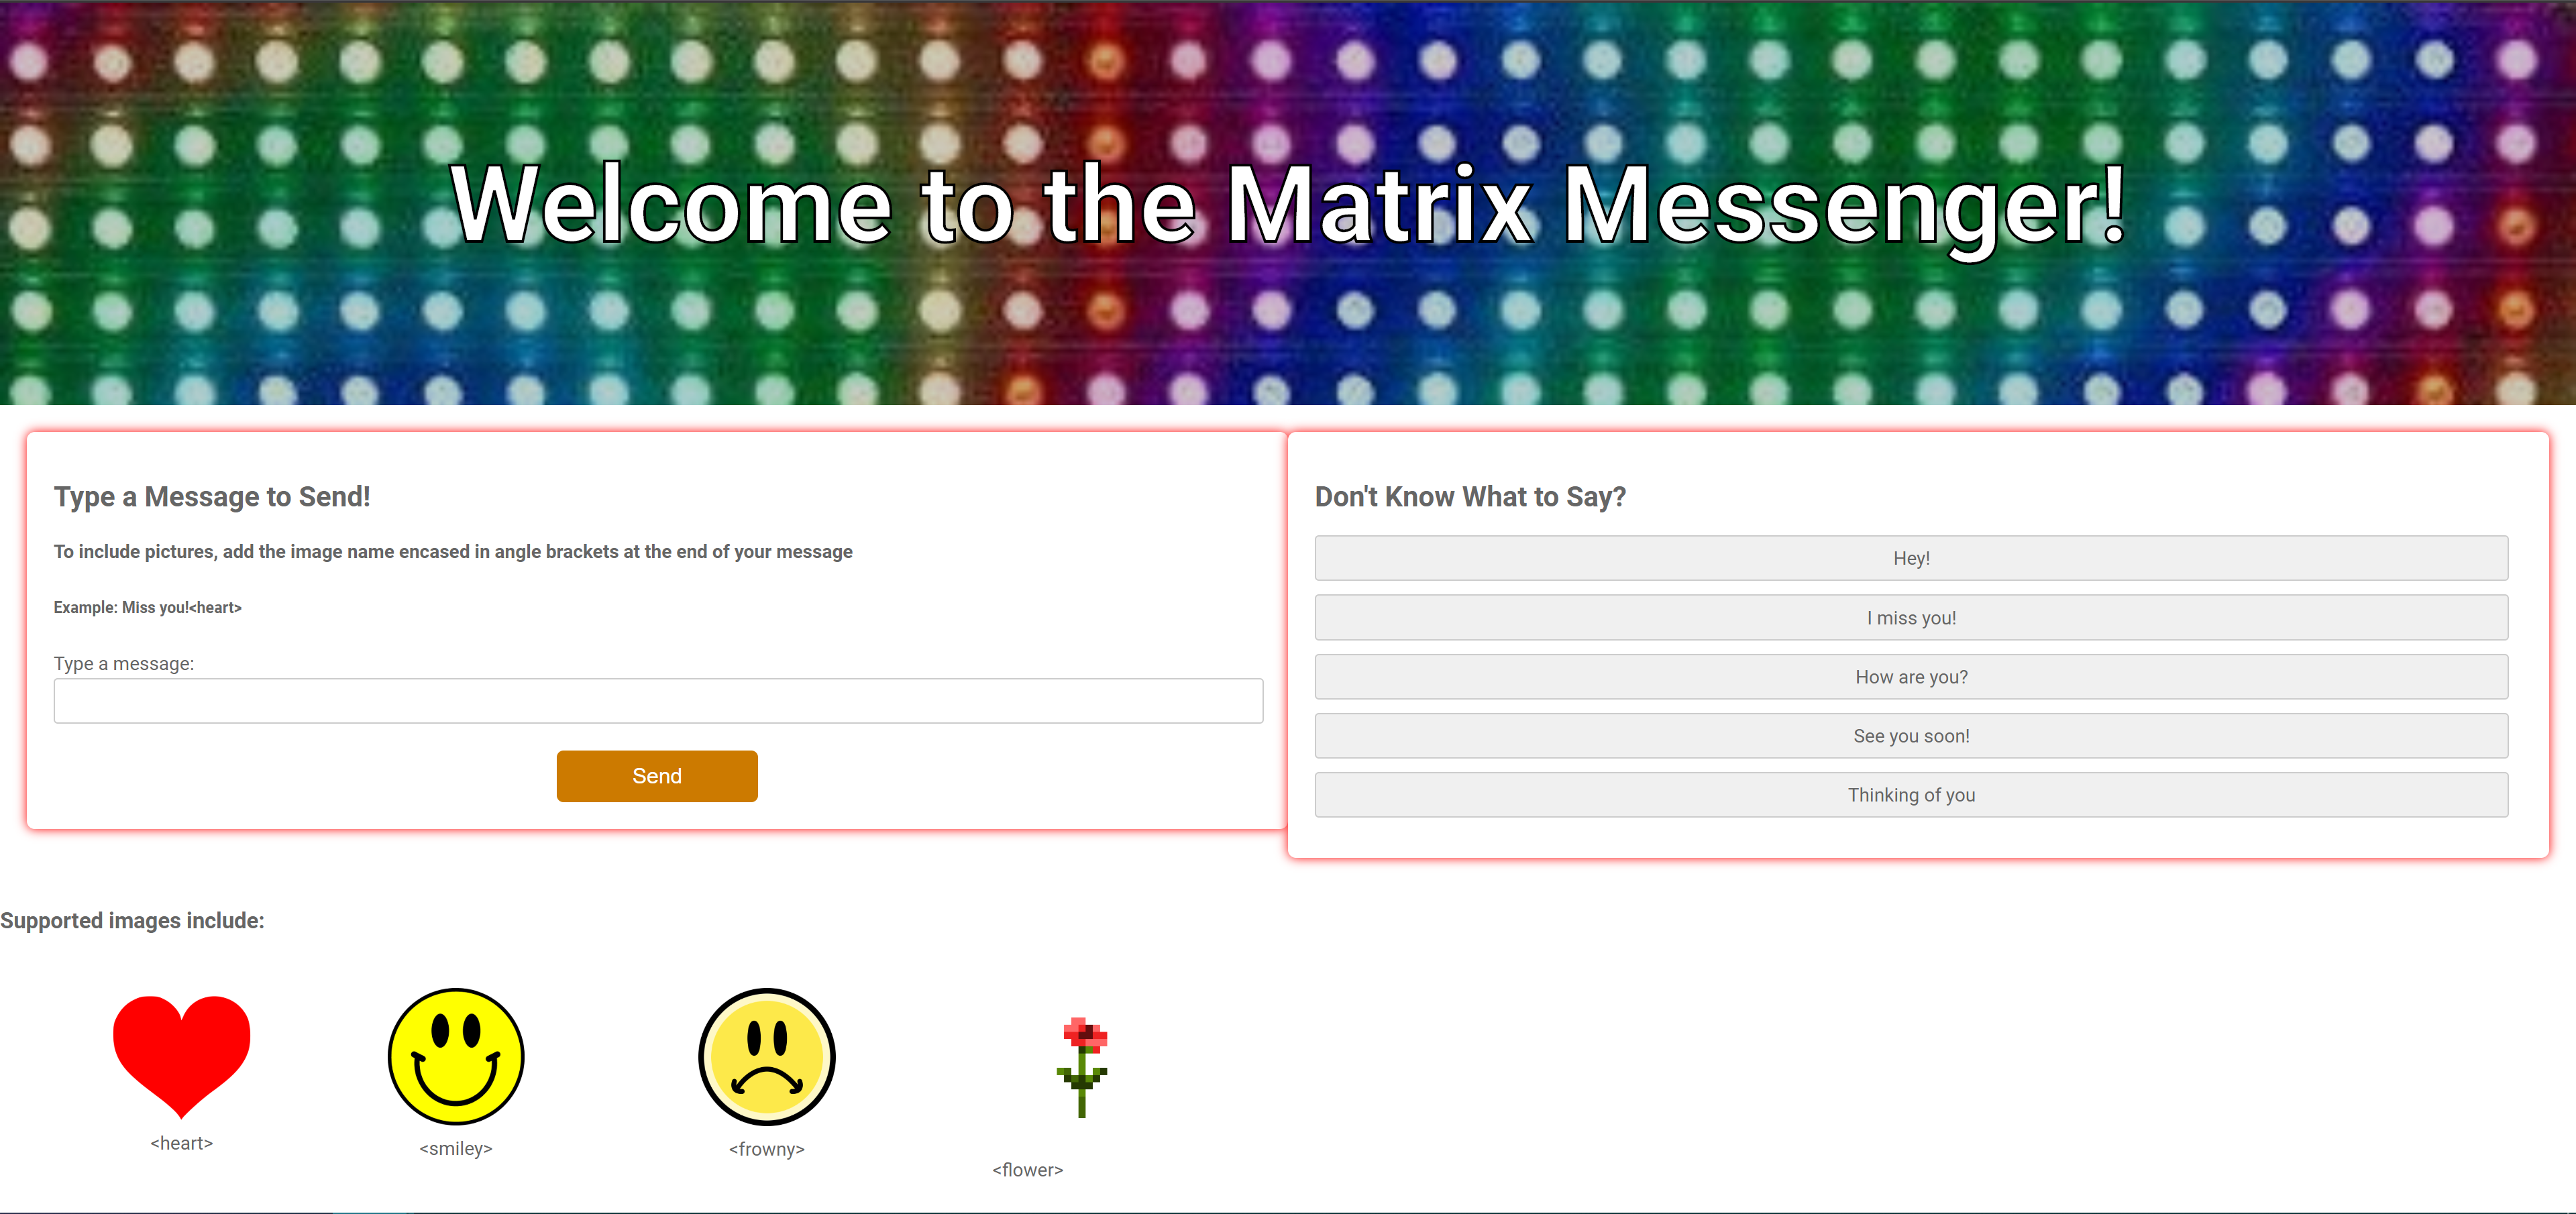
Web app to enter messages
Sensors
We chose to use an IR sensor and an ultrasonic sensor to detect the presence of a nearby person. That way, an LED matrix will not display a received message until it knows someone is around to read it. Owen used the IR sensor in his setup, and Diane used the ultrasound sensor in her setup.
The IR sensor has three pins: VDD, GND, and OUT. The VDD was supplied by the pi’s 3.3 Volt source. The GND pin was tied to the Pi’s GND. Finally, the OUT pin was tied to a GPIO pin on the pi. The use of this sensor was very straightforward- the OUT pin simply goes low when it detects an object within 2 and 10 centimeters. Owen’s pi could then poll this input when his pi has messages to be displayed.
The ultrasonic sensor was slightly more complicated to use due to its UART interface. The ultrasonic sensor had four pins: VDD, GND, RX, and TX. Like the IR sensor, this sensor was powered by the pi’s 3.3 Volts, and grounded using the pi’s ground. The RX and TX pins were then connected to 2 unused pins on the pi. Because data pulses on the RX and TX lines were on the order of 100’s of microseconds, it would have been impossible to simply read and send data simply from GPIO pin inspection. Therefore, we used the Adafruit CircuitPython library to allow for UART communication. The downside to the CircuitPython library is that it only runs on python3, and all our other code runs on python2. We then were forced to separate our python scripts for communication with the sensor, and communication with the LED matrix.
To send information across these two scripts running on different python versions, we used a FIFO. The ultrasonic sensor script was responsible for writing the FIFO when a person was present, and the LED matrix script was responsible for reading from the FIFO.
Results
In the end, everything performed just as we had planned. We were able to demonstrate our project successfully during our final Zoom meeting with the ECE 5725 course staff.
We met or exceeded all our initial goals. We were able to communicate messages between two pi’s, display these messages when a person was nearby, and create a web application that presented a clean user interface when sending messages. With all of that, we added even more features to this project with the default time and weather displays, and the ability to send images.
Conclusion
To reflect, our project achieved a way to communicate between a Flask web application and Thingspeak server in a fun, time-relevant way. We discovered a lot about the Pi and web servers, as well as using a Python binding of C++. We are very satisfied with our project and what we accomplished while both members could not physically meet up and work on it in the same space. Everything we attempted to do, we accomplished so there is not much that we discovered did not work.
Future Work
If given more time, we there are definitely improvements we could make. To clean up the starting interface, we could add all the python scripts to a bash script that runs at pi start-up. With this implemented, a user would not have to open separate terminals to run multiple python scripts simultaneously.
We could also try sending animations to each other. These animations could be sent using a keyword in <>, like our current implementation. Then, when the receiving pi parses through the message string, it would know to animate a display if given that keyword.
Finally, we could enable more users to send and receive messages. This would involve recreating our setups, but having each user subscribe or write to different Thingspeak channels. We could allow users to write to multiple channels or read from multiple channels if they wanted to have a group chat. This project could easily be expanded with more LED matrices, Raspberry Pi’s, and distance sensors.
Work Distribution

Owen Valdescruz
ov37@cornell.edu
Interfaced matrix and set up MQTT protocol.

Diane Sutyak
dms486@cornell.edu
Integrated both distance sensors and built web server.
Parts List
- Raspberry Pi (x2) $25.00
- 32x32 RGB LED Matrix Panel (x2) $60.00
- IR Sensor Free
- Ultrasound Sensor Free
- Power Supply (x2) $12.00
Total: $97.00
References
Pi LED Matrix LibraryCircuit Python Guide
IR Sensor Datasheet
Ultrasound Sensor Datasheet
Flask Server Guide
Alternate LED Matrix Library
R-Pi GPIO Document
MQTT API